Author: colorheartfull

Strawberry Basil Chicken Salad & the Best Method for Cooking Chicken Breasts

Every summer my Mom would make a big bowl of her chicken salad to keep in the fridge. It was the perfect lunch for busy little kids swimming out by the pool all day. She made this traditional summer dish with chicken breasts, celery, red grapes cut in half and rotini pasta. As we got older it became the perfect lunch to keep in the fridge for busy teenagers and summer schedules of sports, days at the beach and sleepovers. I pretty much grew up with the stuff!

As I got older I started parting ways with the white pasta but man did I love those chilled grapes!

Now I’m meal planning for my own family during a Southern California summer and it seems only right that I make chicken salad for our lunches! Every time this summer that I’ve set out to make the classic grape chicken salad, I always end up getting creative, using different fruits and veggies and veering away from the traditional recipe. Last time it was fresh cherries and corn this time it’s strawberry and basil! One of these days I’ll have to go back to my roots!

For this recipe I tried using a different method for cooking my chicken breast and it’s now my new favorite! Sometimes I’ll boil the chicken breasts, especially if I didn’t plan ahead and defrost them but that usually means missing out on flavor. Most of the time I’ll sauté them but I almost always wind up over cooking the chicken and it ends up dry and chewy. Gross.

This time I slow cooked the chicken at a low temperature and it ended up being the juiciest boneless, skinless chicken breast that I’ve ever had! It was so easy – you just flip it once and walk away!

BEST WAY TO COOK CHICKEN:

  • Season your chicken breast and sprinkle both sides with a good dusting of flour while your sauté pan, coated with a little oil, heats up on medium-high.
  • When the pan is hot, throw down your chicken, let it sit for only one minute and then flip.
  • After another minute you immediately turn the heat down to low, throw a cover on your pan and let it sit for 10 minutes.
  • No peeking! After your 10-minute timer goes off you remove the pan from the heat and let it sit for 10 more minutes.
  • NOW you can remove the lid – your chicken is perfectly done!

Sure, it takes longer but the good news is that this method frees you up to do all sorts of other kitchen prep like chopping veggies, unloading the dishwasher, setting the table, whatever you need to do. I thought for sure that I would under cook the chicken and I’d need to put it back on the burner for a couple more minutes but I was surprised to cut into this juicy, flavorful, “pink-less” chicken breast for my salad!


IMG_9334

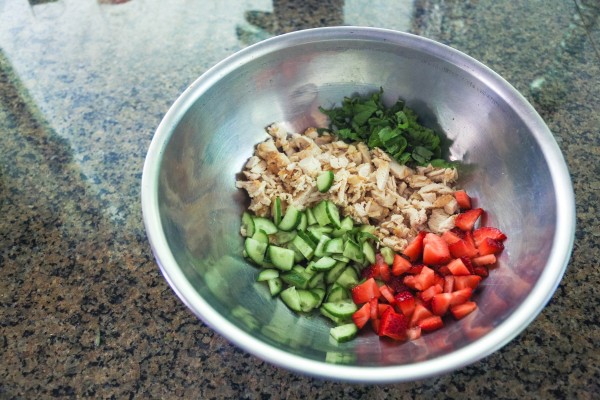
The strawberries are delicious this time of year in California so I chopped up a few of those, quartered some persian cucumbers and thinly chopped some fresh basil off of the new plant that Eric’s Mom surprised me with last week!


IMG_9349
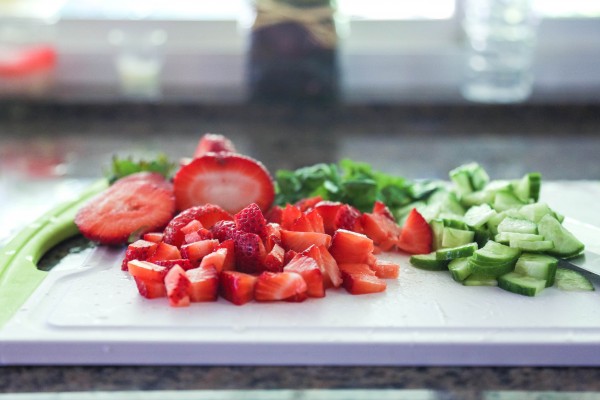
I also added a handful of chopped arugula to balance the sweetness of the strawberries and basil with a little fresh spice.

 
IMG_9357
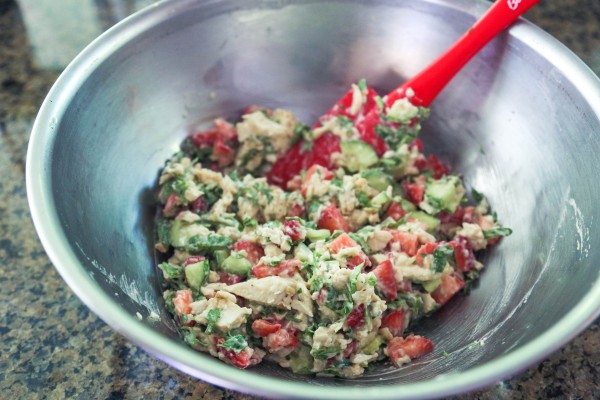
Next, I threw in the juice of half a lemon, sea salt, black pepper, a little celery seed (optional) and a little all-natural mayo.

 
IMG_9374
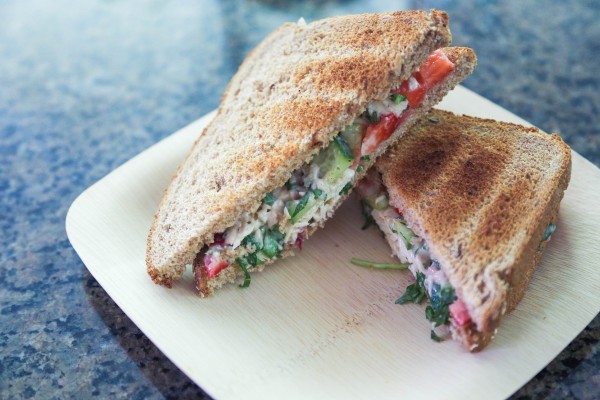
Chicken salad is at it’s best when it’s cold so I like to let it sit in the freezer for a little bit while I clean up and toast my bread.

I love this flavorful and colorful spin-off of the traditional chicken salad recipe! It’s a convenient way to keep some healthy protein options on-hand for a quick lunch!

IMG_9386

Baby Prep: DIY Diaper Clutch & Diaper Changing Pad

I keep going back and forth: to cloth diaper or not to cloth diaper? That is the question. With the cost of disposable diapers and the number of kids we want to have I always thought it would be a good investment to be a “cloth diapering family”. My husband, on the other hand, needed some convincing. The “saving money” aspect was attractive but the fact that our other kids would wear their older siblings diapers was not. I told him that you wash them and that they’re clean but his argument was that his brother washes his underwear too – that doesn’t mean they’re going to share!

We have a long road ahead of us before he warms up to the idea! For the first three months of newborn diapers we’ll use disposables just to help as we get into a new-baby routine. After that we’ll evaluate but I’m pretty sure between the money-saving factor and the convenience factor I’ll be able to show him how easy cloth diapering really can be. That’s my hope anyways.

Either way, whether our son sports Pampers or BumGenius, I wanted a cute and organized way to take my diapers, wipes and changing pad on the go.

This will be the last time I do my cutting, piecing and ironing on the floor. I don’t know why I thought this would be a convenient choice but my back clearly thought it to be a bad idea.

I used some black and white striped canvas fabric that I got from IKEA a couple of months ago and some bleached muslin. I cut a rectangular piece of each fabric that was about 12″ wide and 20″ long, pinned the two fabrics, right sides together, and used a plate to guide my rotary cutter around the two top corners to give me even rounded edges.


IMG_9279

I sewed around the whole clutch except for a 3″ opening on the lower right side. This allowed me to turn my fabric inside out and press the seams properly. Then I used some yellow knit fabric from an old shirt I cut up to sew a pocket onto what would later be the front of the clutch. I wish I would’ve sewn a pocket on the white muslin first before I sewed it to my canvas that way the inside of the clutch could have a little pocket too.

 
IMG_9286

After you’ve added all of the pockets that your little heart desires, you fold the long rectangle up about 8″ or more and pin in place. You can play around with how deep you want your clutch to be compared to how long you want your front flap. When it looks how you like make sure all of your sides are lined up and that the 3″ opening’s seam is ironed in place. Then sew up the right and left side of your clutch.

IMG_9302

That’s it! You’re done! Cute little clutch to hold your diaper changing pad, about 4  diapers (cloth or disposable!), pack of travel wipes and a change of little people clothes. Now all I need to do is find a cute button for the front and add a little velcro on the front flap to make sure it stays closed.


IMG_9389

 
I also made this travel diaper changing pad to take along with me. One side is a waterproof fabric and the other side is cotton. I used the fabric I got for 99 cents/yard at IKEA which seems to make it’s way in almost all of my sewing projects. I cut out the fabric to be about 15″ x 24″, faced the right sides together and pinned in place.

 
IMG_9390


I sewed around all of the edges except for the bottom. I turned the fabric inside out, pressed the seams and then folded the fabric of the opening under so I could iron it flat. Then I sewed the opening shut and sewed random lines across the fabric to hold it together. Next time I should send my fabric pieces to Minnesota to have my mom make a quilted diaper changing pad with her fancy quilting machine!


IMG_9393


There you have it! A quick and easy diaper changing pad to take with you on the go! My husband thinks that I should’ve put some batting on the inside to make it a little cushy for baby’s bum which is a good point but I love that this isn’t bulky and folds up really thin, taking up hardly any space.

One more project down…many more to go!


You are Shining: Hope in Weakness

I was talking with another mom the other day about how pregnancy has a way of exposing idols that you didn’t even know you had. Idols of the heart in regards to appearance, comfort, expectation, the list goes on and from my understanding it never ends as you enter into the refining realm of childrearing.

This process of refining, in marriage, in friendships, in community, in raising babies is all designed for our good: that our hearts would be stripped of any cruches until our hope is in only Jesus. Peace for my heart and hope for my soul can’t be found in anything apart from him. All of these changes, all of these struggles only make that truth more and more real to my needy heart.

And I am so in need.

This morning I read about how in the beginning Jesus, fully God, was there and all things were made through him. In him was LIFE and this life was LIGHT for us. John writes, “the light shines in the darkness and the darkness has not overcome it.” This text fills me with so much hope. Not only does Jesus breathe hope and light into the darkness and depravity of my soul, saving me from what I deserve but he brings life even into the “little” dark parts of my day-to-day growing.

Hope springs up from seeing that light shines in my life and my own darkness can’t overcome it.
I can’t snuff it out.
Not my selfishness, not my anxiety, not my pride, nothing is so dark that this light keeps from shining the message of LIFE.

Remembering this is such an encouragement when it feels like the growing-pains of refinement are happening in every area of my life right now. I can trust that God will address the darkness (no matter how big or small it seems) with light. He won’t leave me to sort through my sin and the hurt it brings on my own but he’ll lead me; teaching me, growing me and restoring me.

As I write this I’m reminded of how someone once told me, “God isn’t worried about you. He isn’t concerned that you’re not going to make it; that you’re not going to learn.” Isn’t that true? God, Sovereign God, isn’t wringing his hands up in heaven just hoping that someday the scales will fall off my eyes, just waiting to see how everything turns out. No, he sovereignly ordained each and every spot of darkness for our good and his glory.

This I know that God, who said, “Let light shine out of darkness,” has shone in our hearts to give the light of the knowledge of the glory of God in the face of Jesus Christ.


IMG_9275

Baby Prep: DIY Graphic Onesies

I found the sweetest little shorts and onesies at the 99 cent store a few weeks ago when I was picking up luau decorations for Grandma’s Birthday Bash! Actually, I found lots of great things there including white tissue paper with aqua polka dots: perfect for making pom-poms to hang over baby’s crib. I also found out that a trip to the 99 cent store can add up quickly with all of these great finds! Still, it’s less than I would’ve spent, getting the same things at Target or the craft store so we should chalk it up as a success. 

IMG_9189
I bought these newborn shorts for my DIY graphic project but also to use as a reference so I can make my own pattern and make more! I really want to make cute little knit leggings but I’m afraid it’ll be too hot for leggings when he gets here. Maybe I’ll just have to make a few pairs in the 3-6 mo. size instead.

My original plan was to paint a black anchor on the side of these shorts. I drew out the type of anchor I wanted with sharpie on wax paper and then used a swivel craft knife to cut out the stencil. I couldn’t have done this project without that tool. The knife swivels 360 degrees letting you trace your design as if you were using a pen. They’re relatively inexpensive from Michael’s, saves you a giant headache and lets you create great details on your design.


IMG_9194

Then I used this sprayable fabric paint over the stencil and that’s where everything went downhill. I had researched different types of fabric paints before I went to buy some and apparently this brand’s formula was most similar to a screen print. What I was trying to avoid was something like puffy fabric paint. I wanted my image to be soft to the touch so I could use it on clothes and plain fabric for other projects.

Well, it turns out that the paint is wonderful – I love the way it dries and sets on the cotton onesie – but the applicator was terrible! Instead of spraying in a fine, contained mist, it sprayed out huge globs of black paint that pretty much drowned my stencil and left behind a giant unrecognizable blob. There was no redeeming the shorts. The fabric washes off of your skin but not fabric (which I guess is a good thing). At least I can still use the shorts for making my own pattern!

Alright back to the drawing board. I had to completely start over but this time I was prepared. I sprayed adhesive on to the back of my wax paper, lined my stencil up on my onesie, stepped very far away from anything else and sprayed the fabric paint onto a paper plate. Also, be sure to insert a folded piece of wax paper inside your onesie to keep your paint from bleeding through. I used a plastic knife to lightly spread the paint over the stencil. Crisis averted.

 
IMG_9213

 
This plastic knife technique actually turned out better than I had planned, giving it kind of an old, texturized look. This method was a lot more forgiving than if I would’ve been going for the clean lines look. It made the stencil look unique and made any imperfections a lot less noticeable.

I peeled off my wax paper stencil right away at a 45 degree angle, making sure it didn’t touch any other part of the fabric and then let it dry overnight. The best practice is to let the fabric set for 72 hours before you wash it. There you have it! As long as you don’t ruin a pair of shorts and have to start over, this is a pretty quick project!
IMG_9217
I was so excited about the anchor onesie that I thought I’d make another one. I told my husband it would only take me 10 minutes but all of the detail in the mane took forever to cut out. I also, for whatever reason, made this stencil on craft paper instead of wax paper. I think the idea was that the paint would dry on the paper and then I could save the stencil to make more for the other babies in my life but as soon as I saw how quickly the paper soaked up the paint it made me nervous that it might bleed through so I peeled it off as soon as I was done.

IMG_9221

IMG_9222

I’m so excited about  how it turned out and I want to make more but now I need to make another stencil on a different material that will survive the painting and peeling processes. One of my friends suggested using contact paper so I’ll have to try that next time. Actually, I have a few sheets of scrapbooking vellum paper that I should use. I also had some ideas using white fabric paint and stencils but I think I’m going to have to switch up my brand since this one was a mess!


Any suggestions in the fabric paint/stenciling department are greatly appreciated! If you’re going to try this at home, learn from my mistakes and buy a few sheets of vellum in the scrapbook department of Michael’s to make your stencil and choose a different fabric paint. I really liked the reviews I read on this paint and it comes in a whole slew of different finishes, textures and colors for less than $2/bottle.

Have fun stenciling!


Baby Prep: Newborn Hats & Mittens

Several years ago, when I moved to Minnesota, I found a keyboard and that took me on a journey of learning piano chords, songwriting and leading worship.
When I moved to California I found a sewing machine!

With the baby on the way and everything changing, I’m trying to be a good steward of the time that I have. I’m getting the opportunity to do things that I only dreamed of during my busy Starbucks life. I finally have the time & schedule availability to join a small group, to meet with other women in the church, to meal plan on a budget (first time I’ve ever had to do that!), to exercise at the start of my day, to support my husband by taking care of all the different odds & ends, work on video & photo projects and…to craft! 

I’ve had so many little ideas here and there throughout the years (and a growing “DIY” Pinterest board) but I didn’t have the time or energy to actually do it myself. Now it feels like I’m “living the dream” as I wait for our baby, work on different projects and adjust to this new life.

I’m not a fan of baby things. When my Mom was asking me about what kind of fabrics I wanted her to use for the baby quilt she’s making, my only rule was “no baby blue”. I’ve never really liked the baby prints or the powder blue (or pink!) color that’s used for blankets, outfits, fabrics…it’s everywhere! When we were registering just last week I was kind of wincing at every other thing my husband pointed out for that reason. Finally he said, “you know we’re having a baby right?”.

So I’m very aware of how ridiculous it might seem that I’m so picky but it’s really just a preference issue that I need to get over since this baby has a whole gang of family members that will be dressing him up and handing down clothes. BUT if you can save money by making your own designs that are more along the style that you prefer, then go for it!


IMG_9168


These little hats and mittens were made out of old knit shirts that I had. I figured since I wouldn’t be wearing an XS for the next several months I might as well save the money on buying fabric and put it to good use! I made up my own pattern for both of these after spending lots of time researching different construction methods on Pinterest and combining all that I learned.

Some of the best tutorials I found were here and here. Just find what method works for you, what size you need and then make your own pattern from there. I drew all of my pieces out on wax paper and saved them with my fabrics for future hats. These are so easy (& inexpensive) to make and perfect for little shower gifts for all the little newborns on their way!


Baby Prep: Baby Quilts & Sewing Projects

IMG_9072-2


My Mom is an amazing quilter. She made me this (my favorite!) shabby chic quilt that was originally for my living room but I love it so much that I lay it out across our all white bedding now. It’s also my way of clinging to just something shabby chic since it was all kicked out of the bedroom as soon as I got married!

With all of these craft projects for baby running through my mind and my Mom across the country in Minnesota, I’m thankful for all the years that I grew up around a sewing machine. I used to help my mom design patterns for quilts (she can sew but she can’t draw a stick figure to save her life) and finished my first quilt in high school. While I worked on a bunch of little projects throughout the years that was my first and last quilt…until now!

I ambitiously (too ambitiously) thought I’d try my hand at quilting again and start with a chevron design made out of tiny squares.
Easy right?
This tiny play-mat-sized quilt took me over 16 hours. I underestimated the need to measure and cut the squares accurately. I should’ve pressed the seams better. I should’ve made the squares bigger. I broke 4 needles in the process. I should’ve sewn with a polyester blend thread. Oh, and I finished the quilt once, ripped it apart the next morning and then finished it again.
Yeah, easy.

But in the end, I look back on it as a labor of love where a lot of lessons were learned.

My second quilt I ever made was for my baby boy.

IMG_9097

IMG_9099
I used fabric from Ikea that was on sale for $0.99! It’s normally $7.99/yard but they must’ve had a bunch of it so it was discounted like crazy. I went back a few weeks later and they still have it. We bought several yards to be used as cheap tablecloths and they’re perfect! If I would’ve made the squares bigger you would be able to see more of the script print but this way is…unique!

I had to stop at “play-mat-sized” because I couldn’t handle 16 more hours of more squares and obsessing over fixing (or not fixing) my mistakes. Turns out it’ll be the perfect little quilt for “tummy time” once the baby gets here!

IMG_9110

After the headache-quilt I couldn’t let that be the way I packed up my sewing machine so I thought I’d try and redeem the experience with something a little easier: the baby’s crib quilt!

I wanted something white (easily bleach-able), something timeless and something snuggly so I decided to piece together different sized strips of textured white cotton fabric. This type of quilt would be so fun to make for a baby girl! I found all different kinds of crocheted lace and little eyelet flowers decorating plain white fabric. It was a little more challenging to find something not so frilly for a boy. I thought I could always use strips of bleached muslin if I ran out of options but I found enough for the size I was going for.

IMG_9142
I made thin strips and fat strips out of each fabric and then lined them up, alternating in a way to get the look I wanted. This time I paid special attention to the length and width of my strips as I cut and measured the fabric. I also made sure to press my seams properly which saved me a lot of work later. I figured out with this quilt that if you pay special attention to the details at the beginning it makes finishing the quilt that much (so much!) easier.

IMG_9148

If you can sew a straight line then you can make this quilt in just a couple of hours. I finished it off with a super soft ribbed minky fabric which was pretty pricey at $14.99/yard (thank God for Jo-Ann’s coupons) but worth every penny. The quilt is so soft and cuddly – perfect for a little baby’s crib!

IMG_9144

I can’t wait until our baby gets here to be wrapped up in this! My husband still has his quilt from when he was a baby and it makes me so excited to think that I made our baby something that he can hopefully give to his baby someday (mildly freaking out at that thought, actually…weird). My sewing experience has been redeemed! 

Many more projects up my sleeve for the near future! I’ve been taking a crafting break to focus on finishing a video project but as soon as that’s done it’s game on: nesting in full swing!

An Eternal Perspective in Birth & Death

[Note: I started writing an introductory paragraph for a post on Spinning Babies & Hypnobabies as I prepare for the birth of our little boy but then I got completely derailed by my own thought processes and taken on a sobering mini-journey reminding me of life, death & HOPE in GOD.] 

I can’t believe that this Sunday will be the start of my 7th month of baby-growing! Wasn’t it just Christmas time when we were sharing the news with our family & friends?

You grow up and people tell you to “enjoy the journey because it’ll go by so fast”. They talk about how you’ll blink and next thing you know your babies are getting married and having their own but that notion, that time would go by so quickly, seems so distant when you’re young with your “whole life ahead of you”. But then we talk about death and the brevity of life, how we’re strangers in this land, sojourners, just like all of the generations before us (1 Chronicles 29:15). Our life is just a shadow, a vapor that disappears as quickly as it came and we’re left cherishing the moments that remain. Because who knows, maybe you’ll die tomorrow. Maybe your whole life isn’t ahead of you.

There’s no guarantee that I’ll live to see my little baby boy grow up, that I’ll celebrate my 40th wedding anniversary or that I’ll even make it to dinner tonight. Every moment that we have really is a gift that God has allowed us to experience. Sure, we hope that our children outlive us and that we’ll die peacefully after 50-something years of marriage, holding the hand of our spouse but that isn’t always the case. Too often people are taken from this earth “too early” and suddenly, leaving us standing there seemingly unprepared and shocked.

But don’t you remember? We’re just sojourners passing through. This life isn’t our home. You dont know what what tomorrow holds. Your life is just a mist that appears for a little while and then vanishes.

So we count the days and plan ahead with hope and surrender. Let this realization cause us not to cling to the things of this life too tightly lest we build up idols that crumble and disappoint. This truth should ignite a child-like trust that is dependent on our Maker for every moment, every need, every next step as we plan and anticipate our days here.

I’ve been reminded of this truth my whole pregnancy as I fight the anxious thoughts of pregnancy complications (my mind runs wild), as we dream as a family and wait for God’s provision and direction in this season. For those that trust in Jesus to pay their debts and cover all of their inadequacies that disqualify them from living eternally, life AND death are beautiful things. We struggle here now for just a little while with heartache and disappointment but we look with hope to enter into our real life in a real city whose builder and maker is God.

So even in the joy of feeling my baby move, seeing prayers answered and planning ahead for a gloriously bright future, I remind my heart that this joy is just a whisper of what’s to come for the people who belong to Jesus when we will live where there is FULLNESS of joy and pleasures forevermore. Imagine that!

Oh, that my joy in this (temporary) season of anticipation and desire for my little baby wouldn’t outweigh my joy in God and my desire for Him alone.

IMG_9084

Worship Music Collection Refresh: Vol. 2

I thought I’d share some of the albums/songs that have been playing on repeat lately in the background of this new season.

If it’s time for you to refresh your worship music collection then I’d highly recommend these additions in your music library!

All Sons & Daughters – I’m not usually a fan of live albums but I love the intimate feeling that they’re able to cultivate and convey in these songs. It almost feels like you were a part of the live studio recording, surrounded by sweet friends, singing your heart out. This is the perfect collection of worship songs to fill your candle-lit room with late at night as you’re winding down. There’s something about the sound on these recordings that makes you FEEL the songs of praise filling the room, it’s truly beautiful.

Matt Redman – We love to sing “10,000 Reasons (Bless the Lord)” around our house but the other day I had my Sovereign Grace station playing on Pandora and found his song titled “Never Once” and I can’t get enough!  Maybe it’s the lyrics that seem to hit me so deeply:

“Scars and struggles on the way but with joy our hearts can say, “Never once did we ever walk alone. Never once did you leave us on our own. You are faithful, God, you are faithful.”” 

That’s been my prayer so much lately, before I even heard this song, just praising God that He never left us to fend for ourselves. Over all these years and all these trials (that He worked for our good) He’s never left us; He’s always protected, provided and sustained us.

“Carried by your constant grace, held within your perfect peace: never once, no we never walk alone.” 

Meredith Andrews – Following in that theme of God’s faithfulness is this song: “Not for a Moment”. It sounds like the typical contemporary worship song (reminding me of Laura Story or Hillsong) but the lyrics are so true and good to remind your heart of:

“After all, You are constant. After all, You are only good. After all, You are Sovereign. Not for a moment will you forsake me.”

Rend Collective Experiment – I first saw Rend Collective Experiment during a worship night at a local Christian college in Minneapolis. They were the worship band opening up for Frances Chan and their energy and joy was infectious! I later purchased their first album, “Homemade Worship by Handmade People”, and it was the perfect little summer worship collection to dance around my house to (someone should put them on tour with Benjamin Dunn). I kind of forgot about them until my husband showed me this video from when they were on tour with Lecrae:

Then I stumbled upon this gem that they put out at the beginning of the year: Campfire. It’s basically the sounds of a friends praising Jesus around a beachside campfire. How perfect! Itunes introduces this album by saying that the new material is infused “with a foot-stomping energy that brings to mind the likes of Mumford & Sons and The Lumineers.”

Another great summer album but this time with more of an alternative, organic vibe. I love that Rend Collective writes Gospel-centered lyrics that keep you mindful of WHY we are free to experience such wholeness & joy.

What worship songs have you had on repeat lately?

The Time I Ruined a Surprise Engagement: Elizabeth & David Actually Got Married

Two weeks ago I spent some time in the good ol’ southern country of North Carolina with old friends, making new friends & celebrating love. Elizabeth was the last of us girls to get married. All three of us had been in Redding, CA for Amy & Paul, LA area for my wedding & now it was time to venture to the heart of the south where she would tie the knot with the love of her life.

This was a pretty miraculous occasion seeing as I (almost) ruined their surprise engagement during my wedding weekend back in October.

For the longest time Amy lived in California, I lived in Minneapolis & Liz lived in North Carolina. The easiest way for all of us to keep in touch consistently was to have an ongoing “group text” where we updated each other on daily life happenings. I still remember the day when we discovered “the power of group message”! I was sitting on the kitchen floor of my little home in Minnesota, drinking one of my favorite Midwest brews (R.I.P…) and laughing as my phone was just shy of literally blowing up from the speed and frequency of incoming text messages. Us three hadn’t been this accessible since we all lived in the same town! Oh wait…that never happened, actually.

Liz moved into the country’s best kept secret of a home town, Marquette, MI, just as I was moving out. She became a part of Amy’s family during her time up at Northern Michigan University and developed a kindred-spirit type friendship with my childhood best friend (Amy). When I would come back to town to visit we’d  spend time with Liz. Meeting her for the first time felt like a reunion with a friend that I had known for most of my life. We hit it off and spent that summer night coloring cement stairs to her house with sidewalk chalk & encouraging words and laughing (obnoxiously) loudly as we laid on the beach and watched for shooting stars.

Fast forward to my wedding weekend. Amy & Paul were coming in town for our backyard DIY (God bless Ruby) wedding. Liz & her boyfriend (who we all knew she would end up marrying) David wanted to come but he had other plans which left Liz flying solo out to LA. A couple weeks before the wedding David called and asked if he could fly in to surprise Liz and propose to her a few days before we tied the knot. I was ecstatic! What an honor to have one of my sweetest friends get engaged to the love of her life in the same place where I would marry mine! It was going to be a weekend of LOVE!

We continued on preparing for the weekend with a little spring in our step, just knowing what was around the corner. Amy & I went to great lengths  to “sheep dog” Liz to make sure she was in the right place at the right time. We had our own set of text messages that contained our virtual girly-giggles of excitement (this would sound so dumb to someone from my Grandpa’s generation) & where we coordinated the secret operation from a distance.

So the day before Liz is supposed to be arriving in town I’m running around the back yard talking with friends and family, working on crafts, introducing people, the whole nine yards of pre-wedding craziness. I quickly check my phone and reply to Amy in what I THOUGHT was our private text conversation with “Yes and David will be here at 4 to propose”.

I went about the rest of our wedding to-do list blissfully unaware for the next…two minutes until everything just stopped. It was like in those Visa commercials where everything is going swimmingly until someone whips out a checkbook and screws up the rhythm of life.
That was me. Screwing up the rhythm of life. I had just blown David’s brilliant, elaborate engagement plan by carelessly replying in the wrong set of text messages.

My life was over.

A few swear words and a moment of shock later, I was unraveling with inconsolable sobs over our wedding crafts as everyone just froze not knowing how to fix this situation. Our friend Ruby was coming up with strategic options (maybe David could change his flight and surprise Liz on the plane?) and my almost-husband called David to break the news while I tore my sackcloth and rolled in ashes.

BY THE GRACE OF GOD, David was forgiving, understanding and worked with us to create a Plan B, Operation: Recover the Element of Surprise.

I think only a few minutes had gone by at this point so I was able to do the lame “Ha! Just kidding!” move and hope that Liz was blonde enough to fall for it. That sort of didn’t work…sort of did.

The next day we pick Liz up from the airport take her to Venice beach, listen to her talk about the ring that she wanted and how she hoped David would propose soon and wait on pins and needles hoping and praying that she doesn’t suspect a thing.

During all of this David is already in town, standing by, ready to walk into the backyard as I’m touring Liz around the “reception area”. He walks in, she starts crying, they share a beautiful moment, she says yes and thankfully my group texting nightmare becomes a thing of the past that we just laugh at.
Thankfully…

So there was this time where my life was over and David & Liz almost didn’t get married and our friendship was ruined forever but then here I stood, on this beautiful property in North Carolina, watching a miracle unfold; keeping my friends & seeing them finally tie the knot.

IMG_8886

This is Amy & Paul at the wedding rehearsal. We’ve been friends for 13 years and in that time I’ve managed to never unknowingly sabotage her marriage.

IMG_8825
IMG_8868

IMG_8858

I’ve been trying out some new filters for post-processing my photos with a more filmic element. I’m glad I shot around a little bit during the rehearsal because once the day of the wedding came I didn’t have time to dig out my camera.

IMG_8876     IMG_8856

A sweet burlap banner I made for the flower girl to carry up and down the aisle. The front says “Uncle Dave, here comes your girl…”

IMG_8881

This is my new friend, Brian. He was the photographer for Liz & David’s big day and did an absolutely incredible job! You can see the first post from their wedding here.

IMG_8894

We spent the day after the wedding hanging out by the pool, getting sunburned and enjoying THE BEST BBQ I’ve ever had in my life! I grew up in Memphis so that should be saying a lot! This family-friend of the bride provided lunch for everyone, complete with his own homemade BBQ sauce and sweet mustard canned in Mason jars. Mmm…and I’m not even a meat person!

IMG_8915

IMG_8952

It’s so fun to look back on the wedding and see how a lot of what Liz imagined for decorations and color schemes actually came to life! It looks just like the photos from Pinterest that we’d send back and forth during our months of planning.


IMG_8973      IMG_8969

IMG_8996


YAY! WE’RE MARRIED!


Gender Reveal

931326_10201199988062936_1238576777_n


FINALLY we’ve “officially” announced (because Facebook is the only thing that makes things official anymore, right?) the baby’s gender!

My husband had big plans to have Ruby put together a “Gender Reveal” party! We were going to have the ultrasound tech write the sex on a piece of paper, hide it in an envelope, give it to Ruby for her eyes only & then she’d make a proper color cake. We’d have all of our family over and then Louie would video the party and our reactions for my family in Minnesota. Sounds so cute, right?

So we go into a 4D imaging place that was just right up the street at about 18 weeks. I still hadn’t found a doctor at this point because of how recently we moved and since I wasn’t feeling the baby kick (yet!) we decided to pay the $45 to see the little person.

I was SO nervous! I honestly had visions of us getting into the room and finding out that the baby didn’t have a heartbeat but my body hadn’t reacted yet so I didn’t know that I miscarried and then the tech, who normally has a really exciting job showing parents their unborn babies, would then have to break the news to me. I’d like to blame my dramatic hypothetical scenarios on the pregnancy hormones but I think it goes deeper than that! Oh, I also thought we’d get in there and see TWO babies!

Anyways, we have the ultrasound, everything looks great. I’m surprised to see only one baby but relieved that it’s actually alive & well! The tech goes along with our plan, hiding the DVD and revealing pictures in the envelope, all the while exchanging knowing glances with her co-workers.

THEN WE GET HOME.

I just couldn’t wait! I begged and begged to open the envelope. Eric ended up hiding the envelope from me since I couldn’t be trusted to wait until it got to Ruby. It didn’t take me long to find the envelope and do some more begging. Finally, at the end of the night, we sat up in our room and watched the DVD with our hands over our mouths, nervously waiting for the big…wait, it’s a WHAT?!

I don’t know if my eyes have ever gotten so big! I forgot to mention that while I was convinced of all of these crazy hypothetical situations, I was also convinced that we were having a GIRL! I was so convinced that it felt like we were looking at the wrong DVD. It’s not supposed to say “I’m a BOY!”, is it?

Eric was over the moon since he was holding out for a baby boy named Thor but mostly because I had been so arrogantly confident that it was a girl and was now put in my humbled place.

It took a few weeks for me to readjust my thinking to baby boy mode but now I’m fully aware with the color schemes of fabric filling up my burlap baskets & our constant conversations of indecision around names.

So no gender reveal party, thanks to my impulsiveness & lack of patience but thank God for the gift of a growing and healthy baby boy!